OPERATION & MAINTENANCE REPAIR PARTS LIST BAJ-50 BATTERY CHARGER [BAJ-50]
Discover the intricacies and strategies behind DP2 Operation, offering valuable insights and knowledge to help you navigate this complex operation successfully.
OPERATION &
MAINTENANCE
REPAIR PARTS LIST
BAJ-50 BATTERY CHARGER
|
|
TABLE OF CONTENTS
|
|
|
Section |
|
Page |
|
I |
INTRODUCTION AND DESCRIPTION |
1 |
|
|
1-1. General |
1 |
|
|
1-4. Description |
1 |
|
|
1-8 Ordering Repair parts |
1 |
|
|
1-10 Principles of operation |
1 |
|
|
1-11 Circuit Application |
1 |
|
|
1-14 Circuit Description |
2 |
|
|
|
|
|
II |
INTALLATION AND OPERATION |
3 |
|
|
2-1 installation |
3 |
|
|
2-5 Pre-Operating Procedure |
3 |
|
|
2-6 Operating Procedure |
4 |
|
|
2-7 Shut down Procedure |
4 |
|
|
|
|
|
III |
MAINTENANCE AND REPAIR |
5 |
|
|
3-1 Preventive Maintenance |
5 |
|
|
3-3 Repair |
5 |
|
|
3-6 Checkout Procedure |
5 |
|
|
|
|
|
IV |
REPAIR PARTS LIST |
7 |
|
|
4-1 Parts Identification |
7 |
|
|
4-4 Ordering Parts |
7 |
|
|
|
|
|
|
LIST OF ILLUSTRATIONS |
|
|
Figure |
|
Page |
|
1-1 |
Battery Charger Model BAJ-50 |
ii |
|
2-1 |
Control and Indicators |
3 |
|
4-1 |
Parts Identification |
6 |
|
4-2 |
Wiring Diagram |
8 |
|
|
|
|
|
|
LIST OF TABLES |
|
|
Table |
|
Page |
|
1-1 |
Table of Specifications |
1 |
|
3-1 |
Troubleshooting Guide |
5 |
|
4-1 |
List of Replaceable Parts |
7 |

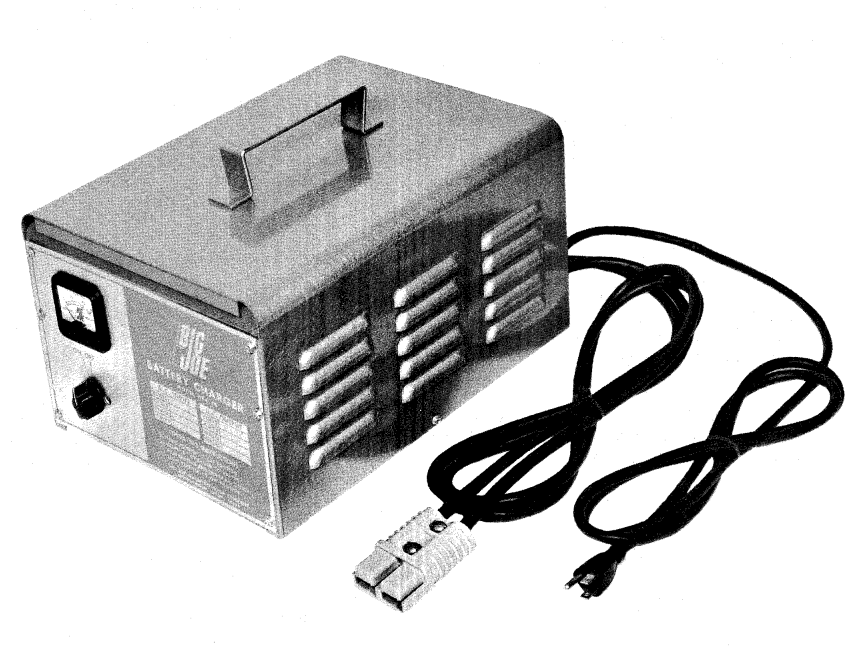
Figure 1-1 Battery Charger Model BAJ-50
SECTION I
INTRODUCTION AND DESCRIPTION
|
1-1 GENERAL. 1-2 The data and instructions in this manual pertain to Model BAJ-50 battery Charger, manufactured by the Big Joe Manufacturing Company, 7225 North Kostner Avenue, Chicago, Illinois 60646. The BAJ-50 is standard equipment with Big Joe lift trucks that use a 360 or 432 ampere-hour battery. 1-3. Proper battery care requires that batteries be maintained at full charge. Generally, a Battery should be connected to the BAJ-50 at the end of the work day. The BAJ-50 is designed so that it will not overcharge a battery if left attached overnight. 1-4. DESCRIPTION. 1-5 Battery Charger Model BAJ-50 (figure 1-1) is a self-contained unit designed to charge 12-volt batteries automatically. In addition to charging a single 12-volt battery, it will charge series connected batteries totaling 12 volt: for example, two 6-volts batteries. 1-6. The table of specifications is a quick reference list of input power requirements, output power ratings, special features and physical characteristics. The data in this table is supplemented by the text in the operation section of this manual. |
1-7 A timer ON-OFF switch is the only manual control. This control is located on the front panel. An ammeter that indicates the charging current flow and a data plate are also mounted on the front panel. The data plate includes condensed operating instructions. The ac line cord and dc output cable extend from the rear panel. the 15 A fuse is mounted on the rear panel. 1-8. ORDERING REPAIR PARTS. 1-9 When ordering repair parts always specify the model and serial number of battery charger as well as the proper part number and part name as selected from the repair parts list. The model and serial number are given on the front plate. 1-10. PRINCIPLES OF OPERATION. 1-11. Circuit Application. 1-12. Battery charger Model BAJ-50 converts 115-vac power into direct current suitable for charging 12-volt batteries. The BAJ-50 automatically varies the rate of charge (ampere-hour) to suit the initial condition (degree of discharge) of the battery and the change in condition throughout the charging cycle. For a slightly discharged battery the initial charge current is low and continues at a low level. For a battery carrying a low charge the initial |
Table 1-1. Table of Specifications
|
Power input |
*115 vac, single phase, 60 cycle, 12 a |
|
Power output |
720 w. (14.2 vdc, 50 a) |
|
Operation |
Automatic taper (declining rate of charge) |
|
|
Automatic cutoff ( 14 hour timer) |
|
|
|
|
Safety Features: |
|
|
Fuse |
15 a |
|
Circuit breaker |
Reversed polarity (break) |
|
Coolong |
Convection |
|
Dimensions |
15 in. lg |
|
|
10-1/2in. w |
|
|
10-1/2in. h |
|
Weight |
42lb |
*Standard, other available as option
|
charge current is high and gradually decrease as the battery approaches full charge. The BAJ-50 supplies a low current continuously to the battery unit the BAJ-50 is shut down by its automatic timer or manually turned off. 1-13. The charging current flow is indicated on the ammeter (1, figure 2-1) during the charging cycle. Since the charging current is inversely proportional to the charge held by the battery, the ammeter actually indicates the current condition of the battery charge. The BAJ-50 will accomplish complete charging of a 12-volt, 360-ampere-hour (6 hour rate) industrial battery in approximately nine hours. 1-14. Circuit Description. 1-15. The ac power is applied to the timer through a 15 a fuse. The manual timer switch is the On-OFF switch of the BAJ-50. The timer ON_OFF switch ganged to a cam which controls the time-on condition. Manually turning the timer ON |
-OFF switch counterclockwise beyond the ON position shorten the period of operation. Full ON period is 14 hours. For normal automatic timing, the cam is turned by an ac motor. 1-16. The ac current feeds through a saturable reactor to a power transformer. The power transformer has a center-tapped secondary which supplies the voltage for full wave rectification. The ammeter and circuit breaker connect in series between the transformer center tap and negative dc output. The circuit breaker opens the circuit if the negative dc output is mistakenly connected to the positive side of the battery. and returns to normal when the connection is made properly. The ammeter indicates total current flow though the dc output cable. 1-17. The dc output voltage is approximately 14.2 v. This output is shunted by the battery being charged and the BAJ-50 regulator circuit. AS the battery approaches full charge, its voltage increases and approaches 12 v. The regulator circuit decrease the output current of the BAJ-50 as the battery approaches its full charge condition. |
SECTION II
INSTALLATION AND OPERATION
|
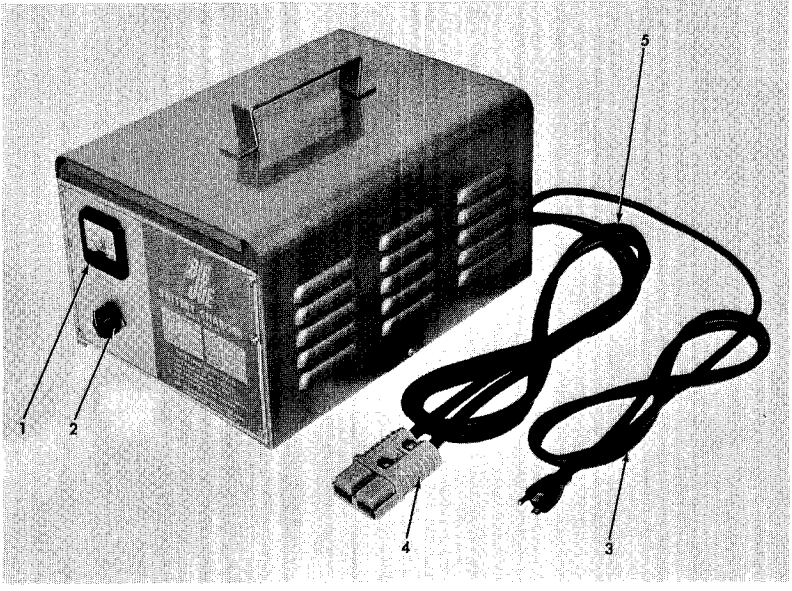
2-1. INSTALLATION. 2-2. Installation of the BAJ-50 consists of providing a proper power source (115 vac, 60 cycle, single phase, 12 a) and selecting a proper location. Even though the BAJ-50 is portable, a permanent location for operation is strongly recommended. In this permanent location insure enough room to bring in a lift truck. 2-3. Always set the BAJ-50 on a flat hard surface to insure proper air circulation under and around it. The area must be well ventilated, because explosive hydrogen gas is generated while charging batteries. Exercise caution to avoid possible open flame or electrical sparks near the area of operation. If the BAJ-50 may be made accessible by keeping it on a sturdy, roller-type stand. 2-4. For general safety, do not place the BAJ-50 on the floor. When the equipment is in use, make sure that the ac line cord (3, figure 2-1) and dc output cable (5, figure 2-1) do not obstruct traffic. |
2-5. PRE-OPERATING PROCEDURE. a. Open cover on battery case and remove vent caps from battery. CAUTION: Impurities in tap water will damage battery plates. b. Check that each vent cap is clean and that each vent hole is open. c. Check fluid level in each cell and, if necessary, add enough filtered or distilled water to cover the battery plates, but do not allow fluid to rise into the cell filler necks. d. Check the specific gravity of each cell to determine the need for charging. e. Recharge the battery if any cell indicates a reading of 1250 or less. |

Figure 2-1. Controls and Indicators
|
2-6 OPERATING PROCEDURE. a. Make sure the pre-operating procedure has been performed (para 2-5). WARNING: Hydrogen gas formed while charging, is explosive. Avoid flame or electrical spark near battery especially when charging. To avoid accumulation of gas, be sure batteries are charged in a well ventilated area. b. Disconnect the battery from the lift truck's electrical system at the dc connector. c. Turn the BAJ-50 timer ON-OFF switch (2, figure 2-1) to OFF, and check that the ac line cord is not connected to power. CAUTION: Reverse polarity connection activates the circuit breaker and prevents the BAJ-50 from operating. d. Connect the battery dc connector to the BAJ-50 dc connector (4, figure 2-1) being careful to match polarity. WARNING: An ungrounded or improperly grounded ac power source can cause severe electrical shock to the user. e. Connect the ac line cord (3, figure 2-1) into a properly grounded 115-vac, 60 cycle, single phase power source. f. Check that there is no open flame or electrical spark in the area. g. Turn the timer ON-OFF switch (2. figure 2-1) to the ON position. |
NOTE: The BAJ-50 will shut off automatically after the completion of the charge cycle (approximately 14 hours). If the charging current fails to minimum value you can advance the timer ON-OFF switch in a counterclockwise direction to reduce the on-time of the BAJ-50. The charge time will be reduced in proportion to the amount of advance. 2-7. SHUT DOWN PROCEDURE. NOTE: If the BAJ-50 has complete its full cycle as controlled by the timer, the timer ON-OFF switch will be in the OFF position. a. If the BAJ-50 has not completed its full cycle, turn the timer ON-OFF switch to OFF. b. Disconnect the ac line cord from the power source. c. Disconnect the ac line cord from the power source. d. Remove each battery cell vent cap and check the fluid level. CAUTION: Impurities in tap water will damage battery plates. e. Add, as necessary, enough filtered or distilled water to each cell to cover the battery plates, but not enough to allow fluid to rise into the cell filler neck. f. Replace the battery cell vent caps. g. Reconnect the battery to the lift truck electrical system. |
SECTION III
MAINTENANCE AND REPAIR
|
3-1. PREVENTIVE MAINTENANCE. 3-2. Battery Charger Model BAJ-50 requires minimum maintenance. Perform the following procedure monthly to keep your BAJ-50 in top working order. a. Inspect the BAJ-50 ac line cord and dc output cable for worn insulation or damaged connectors Repair or replace any defective parts. b. Verify that the BAJ-50 has not been moved near a source of heat such as steam pipes, ect. c. Inspect the case and area around the BAJ-50 for interference with the free flow of air. Since the BAJ-5o is convection colled, remove any obstructions from the top of, or around the case. d. Inspect the BAJ-50 for chipped paint, dirt, grease, ect. Touch up paint and wipe off foreign materials. 3-3. REPAIR. 3-4. If the BAJ-50 is not operating properly refer to the troubleshooting table, table 3-1, for guidance in locating the defective part. The troubleshooting table is supplemented with a wiring diagram. To locate or identify any of the replaceable parts refer to figure 4-1 and table 4-1. 3-5. A continuity check for open or short circuit will indicate the condition of most of the parts. Be sure that the |
ac line cord disconnected from the power source before checking continuity. 3-6. CHECKOUT PROCEDURE. 3-7. After the equipment is repaired it is advisable to check that the output is satisfactory. a. Check that the BAJ-50 is not connected to a power source and that the timer ON-OFF switch is OFF. b. Connect a dummy load resistor (0.284 ohm 1 kw) across the dc output connector. WARNING: The high voltage present in this equipment may cause severe electrical shock. c. Connect the ac line cord to the 115 vac power source. d. Turn the timer ON-OFF switch to ON. e. Note that the ammeter should read 50 a. f. Turn the timer ON-OFF switch to OFF. g. Disconnect the ac line cord from the power source. h. Remove the dummy load. |
Table 3-1. Troubleshooting Guide
|
SYMTOMS |
POSSIBLE CAUSE |
PROCEDURE |
|
Ammeter indicates no current flows. |
1. Circuit breaker open |
Reverse polarity of dc connection to battery. |
|
|
2. No power at source |
a. Check that ac line cord is plugged in properly. |
|
|
|
b. Check that power is on at source. |
|
|
3. Blown fuse |
Replace fuse. |
|
|
4. Defective component such as ac line cord, dc output cable, ammeter, circuit breaker, or timer |
Replace defective component. |
Table 3-1. Troubleshooting Guide (Cont)
|
SYMTOMS |
POSSIBLE CAUSE |
PROCEDURE |
|
Ammeter indicates low current flow. |
1. Battery is fully charge. |
Disconnect charger, if desired. |
|
Ammeter indicates low |
2. Charger output is low. (Refer to para 3-6). |
Replace automatic regulator. |
|
Ammeter indicates excessive current and current does not decrease. |
Defective regulator circuit. |
Replace automatic regulator or reactor. |
|
Ammeter indicates current flow after the 14 hour operating period. |
1. Timer ON-OFF switch shorted. |
Replace timer. |
|
2. Timer motor-to-cam coupling damaged |
Replace timer. |
SECTION IV
REPAIR PARTS LIST
|
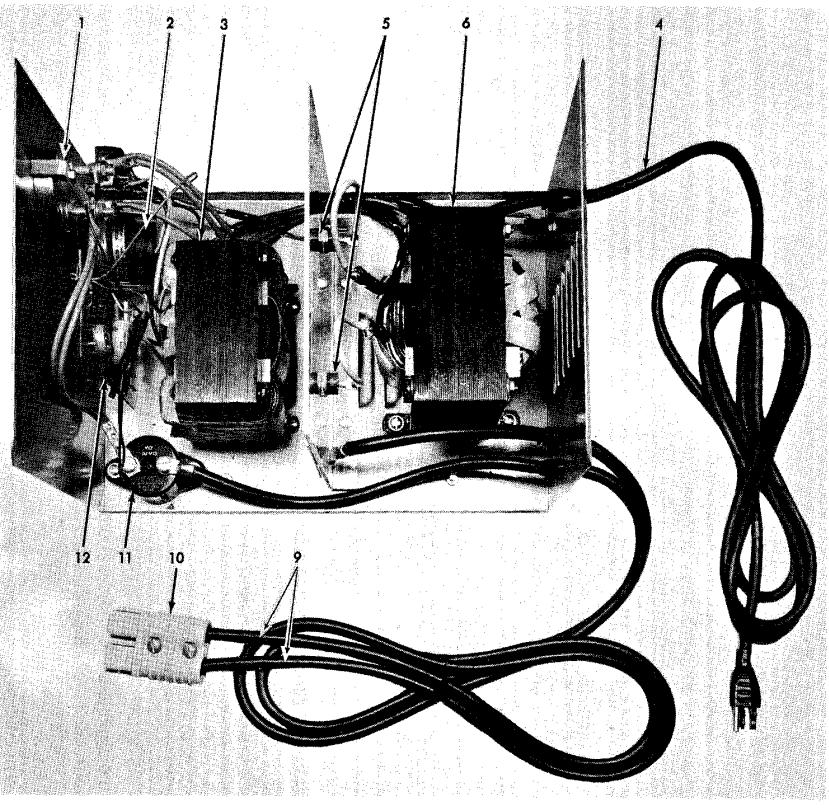
4-1. PARTS IDENTICIFATION. 4-2. The parts list (table 4-1) and illustration (figure 4-1) identify replaceable parts. The callouts on the illustration correspond to index numbers in the parts list. By visually comparing the part in the illustration with the part in the equipment, errors in ordering can be minimized. 4.3 The parts list includes the index number, Big Joe part number, part name, and quantity used. When applicable, the part manufacturer's name and his part number are included in the description column. Attaching parts and common hardware such as screws, nuts and washers are readily available from local sources. |
4-4. ORDERING PARTS. 4-5. When ordering parts be sure to include all of the following: a. Battery Charger Model No. (See front plate). b. Battery Charger Serial No. (See front plate). c. Big Joe part number. d. Part name. e. Quantity of parts required. |
|
INDEX NUMBER |
NUMBER |
PART |
UNIT PER ASSY |
|
|
004923 |
Charger Assy |
|
|
1 |
015607 |
-Ammeter |
1 |
|
2 |
021703 |
-Timer (Lux pt no. T-14) |
1 |
|
3 |
018363 |
-Reactor |
1 |
|
4 |
005802 |
-AC Line Cord (Belden pt no. 174198) |
1 |
|
5 |
018361 |
-Rectifier (Motorola pt. No. 1N1185) |
2 |
|
6 |
021805 |
-Transformer |
1 |
|
7 |
008910 |
-Fuse (Bussmann pt. No. ABC15) |
1 |
|
8 |
009501 |
-Fuseholder (Littelfuse pt. No. 34214) |
1 |
|
9 |
005804 |
-Dc Output Cable |
2 |
|
10 |
005400 |
-Connector (Anderson pt. No. SB2-6313G6) |
1 |
|
11 |
005001 |
-Circuit Breaker (Texas Instrument pt. No. CLA-90) |
1 |
|
12 |
018362 |
-Automatic Regulator |
1 |

Figure 4-1. Parts Identification.

Figure 4-2. Wiring Diagram

*Click on link to see original document: